Monday, July 20, 2015

Buffalo & Beef Andouille Sausage

My wife, Jesse, has decided that we are starting the Whole 30 diet as of tomorrow evening. Since we managed to do Paleo during the summer last year, we are going to try Whole 30 for at least a month, if not longer. Whole 30 from my understanding (what Jesse told me) Whole 30 is a stricter version of Paleo. Good thing I'm a meat and potatoes kind of guy, oh wait - no potatoes :-/ When we were on Paleo I recreated a few recipes since there are limited ingredients/spices which can be used. So I found a great recipe to alter to help with my lunches and dinners: Andouille Sausage.... the Stephen way ;-)

Most store-bought sausage has sugar in them, which as everyone knows, is not allowed on the Paleo diet, much less the stricter Whole 30 diet. This also is a great way for me to get Jesse to eat sausage. She claims that if she can see what goes into the sausage she is more likely to eat it, knowing there isn't a lot of extra fats or leftover random meats thrown in to make it. So I made my own twist, instead of using pork for this sausage, I used Buffalo and lean ground beef from Whole Foods. I will say that the sausage is delicious and has great flavor, but some might think its a little dry since the fats aren't there to make them juicy. I'd suggest leaving a little fat (not a ton) so that it isn't dry, but not overly fatty/juicy and keeps the delicious flavors. By the way, one major need for this, a meat grinder. So my twist is listed below:

Stephen's Homemade Buffalo & Beef Andouille Sausage
Makes 16 links
Nutritional Facts (per 1 serving):
185g Calories, 4g Fat, 35mg Cholesterol, 911mg Sodium, 5g Potassium, 1g Carbs, 0g Fiber, 
0g Sugars, 32g Protein, 2% Vitamin A, 0.1% Vitamin C, 0.1% Calcium, 8% Iron

                                                                      Ingredients:
                                                                      2.5 lbs Buffalo Stew Meat
2 lbs 95/5 Lean Ground Beef
3 Tbsp Minced Garlic
2 Tbsp Sea Salt
1 tsp Ground Black Pepper
1 tsp Cayenne Pepper
1 tsp Chili Pepper
1/8 tsp Mace
1/8 tsp Allspice
1/2 tsp Dried Thyme
1 Tbsp Paprika
1/4 tsp Ground Bay Leaf (roughly 1.5)
1/4 tsp Sage
3 Tbsp Liquid Smoke
1 Sutter Home Merlot Individual Serve (roughly 6 oz)
hog casings


Wednesday, July 1, 2015

Wooden Beer Crate Towel & Soap Storage

I decided to take my wife over to Ponchatoula, LA for a Saturday afternoon to walk around the antique village and grab dinner with some college friends. While we were walking around, I stumbled across an old beer crate that caught my interest. I noticed that not only did the crate have a nice rustic look, it had a great logo across each side panel. Not that my wife was a huge fan of the crate, I started to try and talk her into the idea when I explained we could use it as a shelf/storage in the guest bathroom. Needless to say, it was still not an easy sell to her, since it was not "in the vision" for the interior design of the house. Of course, I'm a rockstar and won't budge on some things I want, so as seen below, I bought it for $20. 

I cut a two (2) 10 inch pieces of 1x2 board to create a mount to the wall, so that the crate wasn't flush against the wall. At the same time, I cut a 1x4 board into a 9 inch shelf for the interior of the crate. Once I stained the "shelf" and "wall mount" with Varathane Dark Walnut, I nailed them in place.

I mounted the crate to the wall mounts and let my wife add the towels, washcloths, soaps, and shampoo for when guests stay at the house. To the left is a picture directly facing the crate as it is mounted and finished.

On a side note, the crate shelf has grown on my wife over the past few weeks. She also realized the crate was from a beer company which brews its beer near Montreal, Quebec, Canada where we honeymooned back in December.


Tuesday, June 2, 2015

Mississippi State Bulldogs themed Bottle Cap Opener


While I was picking up a few items at Home Depot, my favorite store, I walked past the center aisle promotions on the way to the cash register and noticed a few items. It was the summer display with grilling accessories, fans, ice chests, chiller fans, and bottle cap openers.

I noticed the animal head bottle cap openers and saw they had a bulldog and a bear. Next to the animal bottle cap openers, they had a plain jane bottle cap opener which included a steel pan to put bottle caps in after popping them open. As hard as it may seem, I have two friends that are HUGE Mississippi State Bulldogs fans and live in Baton Rouge, La (home of the LSU Tigers). Since they have an upcoming wedding and I always make a personalized gift for my close friends rather than a store bought gift off the registry, I would buy these bottle cap openers and create a mix of the two.

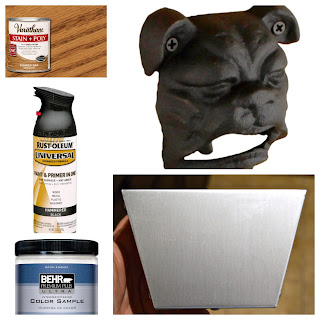
First, I took the steel pan and rigged up some twine in the back screw holes. I suspended the pan from a metal hanger in the garage so that I could paint a base color and cover all the surfaces.

After the paint dried, I had Home Depot create a sample of their interior semi-gloss paint using the maroon color swatch. I used the white base color and the tinted maroon sample paints to freehand the lettering and numbering. As you can tell, I added the Mississippi State University logo as well as their wedding date and my artist signature to the pan.While the paint dried on the pan, I stained a piece of scrap wood I had in the garage from another project. After the initial coat of stain, I added a second coat to ensure the piece was covered and it created a somewhat darker color. When the stain dried, I added the bulldog head to the wooden base and added screws for the pan to attach to the wood base. On the backside of the wood, I added two eye hooks for hanging the bottle cap holder on the wall.

After adding a personalized message to the back of the gift, I sealed the piece of wood with a 2 layers of clear coat sealer. Although the saying is personalized and spot on accurate for the couple we gave this to, my wife accidentally messed up the message while writing it, so we had to alter the message.

"Cheers to a long...." changed to "Cheers to a lager life together - pop a bottle when times get stout!"

My wife missed the "n" in long and then we both started trying to think of a way to save the message, otherwise I'd be sanding the message off and re-staining the wood before the next message was written. I'll say this, my Bachelor of Science in International Marketing from University of Louisiana at Lafayette sure did come in handy when the message/slogan needed to be fixed.

Needless to say that my friends enjoyed the gift far more than I could have imagined. We toasted the gift with a few lagers from the local brewery, Abita Brewing Company.

Saturday, April 4, 2015

Refinishing a Wooden Teachers Desk

I thought my Sunday would be like most Sundays have been the last few years, go to church and then relax around the house, grab dinner with the family.

This Sunday was a little different, it was the Trash & Treasure Sale weekend. If you are unaware of what the Trash & Treasure Sale weekend is, the Inner Wheel (the women's group of Rotary Club) hosts a large garage sale at a vacant department store in the local mall.

Lucky for me (or should I say unluckly for me) I found a solid wood teachers desk, previously used by the United State Department of Veterans Affairs (USDVA) that was listed at $40. Since it was Sunday, the last day of the sale, all items were 50% off. So the $40 solid wood teachers desk became $20 and I knew my wife would not let me pass it up. Once of the sides was coming apart, but four (4) nails did the trick of fixing all the issues with the stability of the desk. The next step for this desk was its appearance.

I made quick work of the exterior using my Black and Decker Orbital sander, which I picked up at Walmart for a mere $24.99. As shown, they layered the stain over the desk time after time, rather than standing and re-staining the desk when it started to show wear and tear. When I started sanding through the layers, I took a rough estimate of 4 layers of stain were caked on top of one another. When I say bare wood never looked so nice, I mean it wholeheartedly.


Once I worked the sander over the entire desk and drawers, I went back over the metal areas of the keyhole and locking mechanism under the desk. Just like the wood, it's amazing what a little TLC can do for old pieces of history. It turned the metal keyhole and locking mechanisms a shiny silver after starting off being a dull bronze/gold color.


Once I finished all the sanding, I moved it inside the office until it was ready to be stained. I should probably clarify for the "until it was ready to be stained", which was not due to additional steps to prep for staining, but rather the lack of time in my work schedule to complete it within a day or two from sanding it.

My go to stain, which I use on almost every wood element in my home, is the Varathane Dark Walnut wood stain available at Home Depot. I tend to use this color stain when I'm trying to create the rustic look, my wife and I agree upon throughout the house.

I tend to use a thick layer of stain on the bare wood, so it would look almost like a puddle of paint that you'd spread from edge to edge. Once I cover the entire desk area, which you are staining, I took a clean rag and wiped across the same area I just covered with stain. This does two things, grabs any excess stain that is not soaking into the wood and it allows the stain that has soaked into the wood to breathe and dry at a quicker rate, since it is not puddled on top of the wood.

This might seem counter productive to some, but I've found my method helps me stain at a quicker rate since I always use two coats of stain to gain the darker color variation compared to one layer which does not always reach the color you desire.

I added some drawer pulls, which I picked up at Lowe's, and it helps tie the rustic look from the rest of the house into the office area.

See below for pictures during the process and as it sits now.

Make sure to check back for more projects as I work though them, and for some healthier versions of some delicious Cajun recipes.

Monday, December 22, 2014

Groomsman Gift - The idea that kept evolving....

As I mentioned in the first post, I was engaged to get married to my fiancée, and on December 20th we finally tied the knot up in Alexandria, LA.

As everyone knows, the groom typically gives a gift to his groomsman for helping with the wedding proceedings and all this associated with it on his end. So I'm not a huge fan of useless items that never get used, but you feel obligated to hold on to it, because someone gave it to you for being in their wedding five or ten years ago. So I decided to look for a gift that was practical and useful.

For all that have not met Pinterest and Etsy, trust me, they are your friend when looking for ideas. I searched on both for ideas for a groomsman gift and finally found an idea right around Thanksgiving, a railroad spike knife. I clicked through Pinterest into the Etsy store, only to find out it was a blacksmith that was located 5 minutes from my office. When I say I could literally leave my car at the office and walk to his shop, I mean it.

I started looking through his designs and found the one I wanted, the cottonmouth. The best part of the gift was that my family and future-in-laws only thought the gift was for the groomsmen. I recognize the importance of other men in my life, my father, my father-in-law, and my uncles, who flew to Louisiana from Pittsburgh, PA for my wedding. So I ordered the knives from CineScape Studios in Baton Rouge, LA with the hope that they would all get made in time, since he hammers each knife by hand with no other workers.

Terry at CineScape Studios called me to pick them up and they were amazing but I couldn't figure out how to wrap them up and give them to the guys. I searched for a small gift box at Walmart, Target, Hobby Lobby, Michaels, Dollar General, Winn-Dixie, and Hallmark to put the knives in, but none were the right size. They were either too small or extremely too big for the knives. So I decided to just build a wooden box to put each knife in.

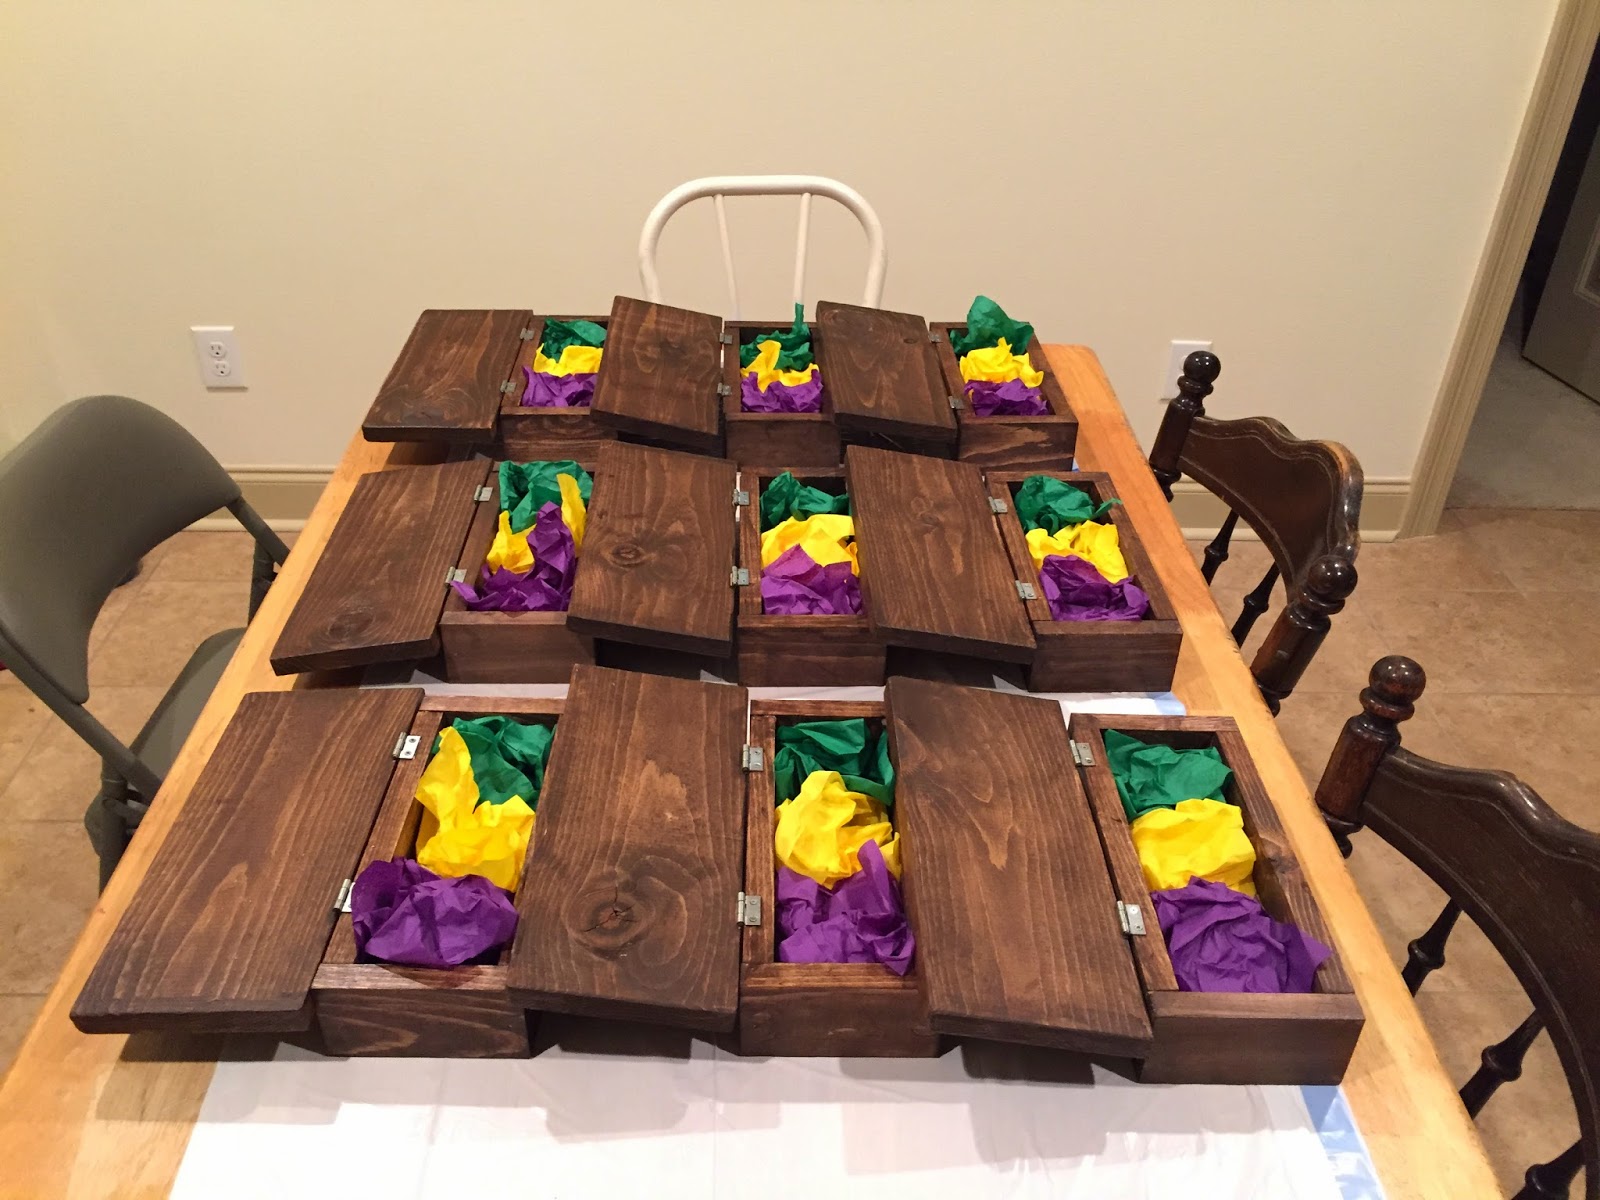
I went to Lowes and bought a few pieces of lumber, cut it on my miter saw, then nailed it together. I added a top piece of wood to the top of the box as a lid using two small hinges. I then stained it and let it dry for about 3 hours.


After it was dry, I used some purple, gold, and green (Mardi Gras) tissue paper to line the inner box to place the knife on top of. After closing the lid, I wrapped each box with some twine and got ready to give it to the guys.


They were really excited about the knives and a few got used before the wedding during a hunting trip that morning.

Monday, November 24, 2014

The Floating Shelf in Dining Room

It started out as a shelf and scones to add something to an empty wall, and what it turned into was a two weekend project.

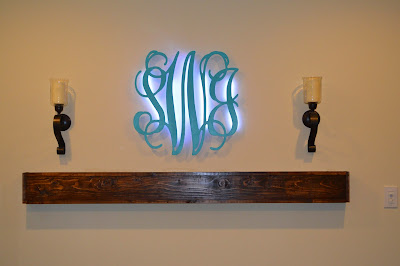
Jesse found the candle scones at Hobby Lobby and I bought some lumber at Home Depot. Between the initial concept thoughts of the space, Jesse was given a bridal shower in her hometown. One of her good friends gave her wood initials for a gift. Jesse had the idea of painting them teal to go with the color scheme of the house, since they were white and the walls were khaki.

After painting the initials, I mounted the candle scones, added the floating shelf and then drilled out the holes for the initials. During the process of the build, I decided against the vision of my future bride, to backlit the initials with white LEDs. I wired up the LEDs and dropped the wiring through the wall and into the empty portion of the shelf.
 

I ran the wires from the LEDs and power source to a switch, which is tucked away in the bottom of the wooden shelf. After hanging the initials, I taped off the areas of the wall that would be affected by paint. I added a dark walnut stain to the shelf and called it a finished project.


Sunday, November 16, 2014

Welcome to Modern Cajun!

I'll start out by introducing myself and telling you a little about me. I'm Stephen, currently working the Supply Chain Management within a Higher Ed setting. I am currently engaged to my fiancée, Jesse, and am roughly under 40 days until the wedding day. I love the culture of Southern Louisiana and love incorporating many of the simple times than make Louisiana unique into my life and my new home.

One of the many things people initially think of as a Cajun must have are Fleur de Lis throughout your home. I'll be the first to say that I love Fleur de Lis within reason, and Jesse is the same way, so we try and limit the amount throughout our home, just use them as accents.

I little backstory into my life, I grew up playing sports and focused on that until I switched gears and focused on my education. I took a little time to figure out what I wanted to do in life, so I took many twists and turns in my education and work career. I have an associates degree and two bachelors degrees. When I was thinking of getting engaged to my fiancee, I started a business to supplement my income since I was working on my second bachelors degree. I ran a business out of my house and paid for her engagement ring. After we got engaged she was about three months out from renewing her apartment lease, so since our wedding was less than a year away, we decided to look for a house.

With rates for rent and for mortgages being so close to one another in our area, we made the decision for both of us to travel about 30 minutes to work each way, which enabled us to get more bang for our buck in the way of square footage and property size. We went with a new build that was within our price range, but needed a few additions to add character and our touch in our new home.

I myself like the outdoors, so its only natural that I wanted a fire pit and outdoor kitchen. Jesse would prefer inside touches to be added and make life more enjoyable, so as the saying goes, "Happy wife, happy life."

A heads up as to the types of things you'll find in the Modern Cajun blog: do-it-yourself home improvement projects, cooking recipes, workout tips, travel, family, and enjoying life as a young couple living in Louisiana.